
Scraping. The moral grey area. The necessary evil. Maybe even illegal, in some cases.
Many large companies are participating in scraping (not that it justifies it):
- Boxed.com
- Camel Camel Camel
- Even Walmart was caught scraping Amazon!
However, in reality, it can be classified as indexing. Just like Google indexes your website, you may want to build an index of your own.
What if we want an index of ASINs with pricing?
If you are going to index, then you need to obey the robots.txt rules and set the user agent to a unique identifier that makes it clear that it is a bot.
You may also want to create a page for your bot with contact details, in case the website you are scraping wants to send you a cease and desists, which apparently can also be illegal.
Moral and legal issues aside, sometimes you "gotta do what you gotta do."
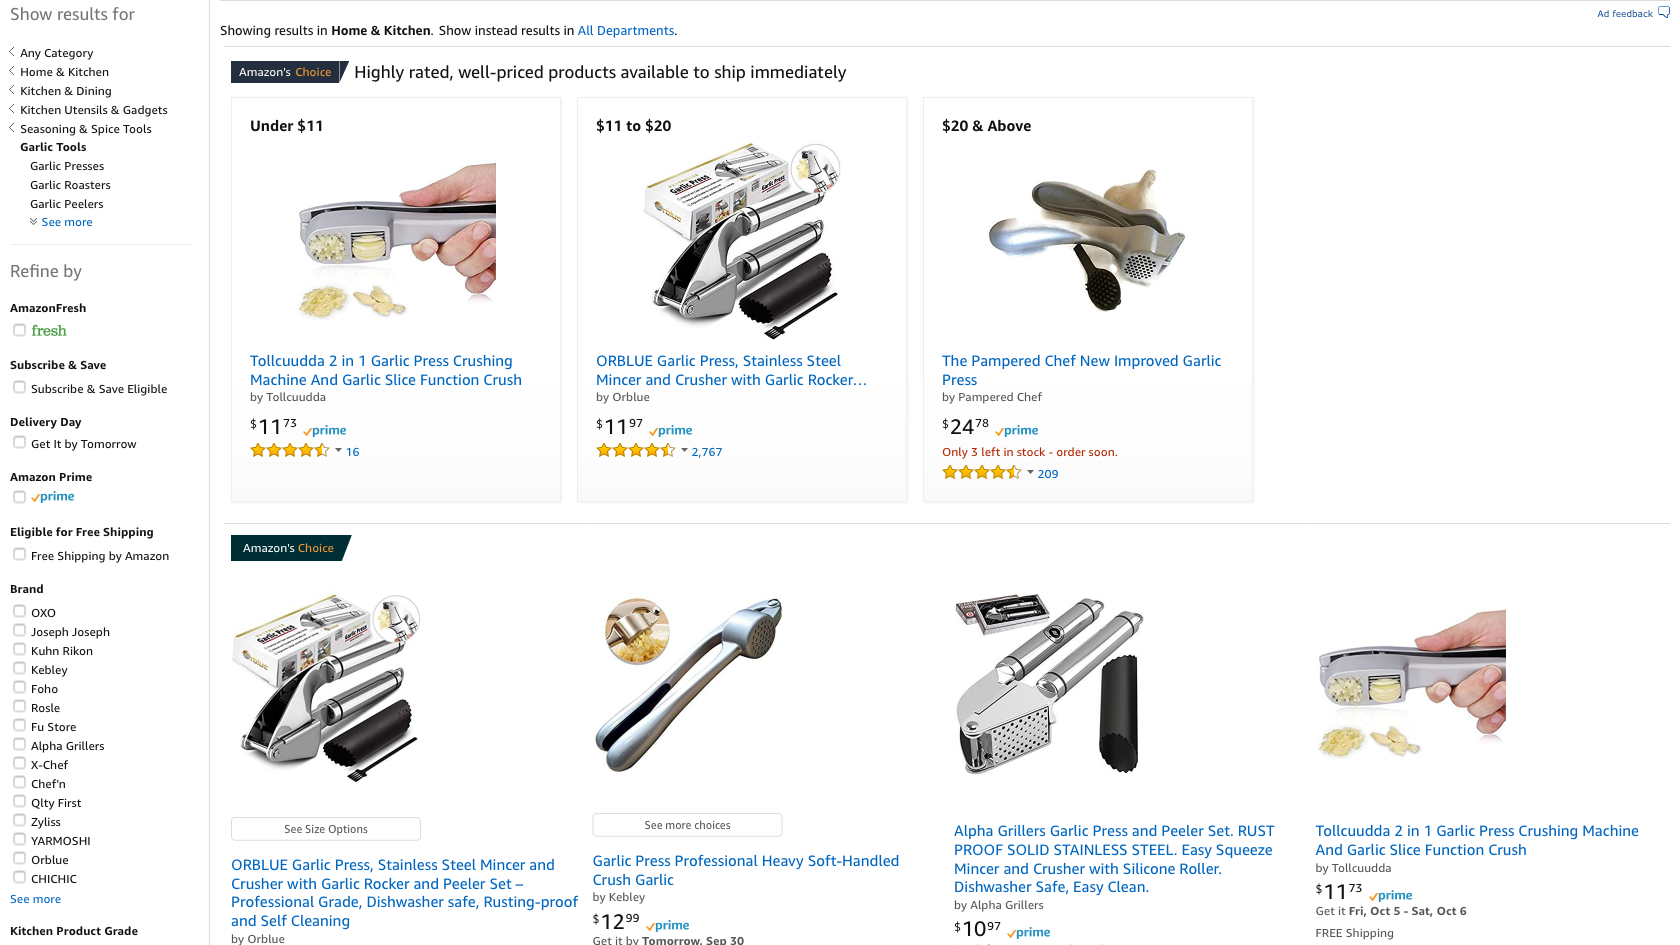
How to Scrape Amazon Search Results
In this issue, we are exploring how to scrape Amazon search results for the infamous garlic press.
For that, we are using Apify, which dubs itself as the web scraping and automation platform. It is a platform as a service (PaaS) solution with a very narrow focus - helping developers with scraping needs.
Apify provides a set of APIs and an SDK library that we are using to write this scraper solution and then launch it quickly without having to set up any infrastructure ourselves. Think of it as Heroku for scraping.
Platforms like this are great for small-to-medium sized projects but seems a bit costly for large jobs.
The free developer plan provides 5,000 page requests per month.
Note that you can run the code on your infrastructure as well, but you don't get all of the benefits of PaaS, such as resource allocation, proxies, storage, GUI and API access to your data.
Getting Started
## install the initializer CLI tool
npm install -g apify-cli

## this step takes a while because it is installing a full Chromium browser
apify create --template=puppeteer not-amazon-scraper

cd not-amazon-scraper
Now you have a project scaffolded, and main.js contains the actual scraper code.
Let's replace the contents of main.js with the following starting code:
const Apify = require('apify')

Apify.main(async () => {
  const input = await Apify.getValue('INPUT')

  if (!input || !input.keyword) throw new Error('INPUT must contain a keyword!')

  console.log('Launching Puppeteer...')
  const browser = await Apify.launchPuppeteer()

  console.log(`Searching for keyword ${input.keyword}...`)
  const page = await browser.newPage()
  await page.goto(`https://www.amazon.com/s/?field-keywords=${input.keyword}!`)
  const title = await page.title()
  console.log(`Title of the page is "${title}".`)

  console.log('Closing Puppeteer...')
  await browser.close()

  console.log('Done.')
})
The ./apify_storage/key_value_stores/default/INPUT.json file contains the input object that CLI tool automatically passes to our scraper script. In production, we can set this input object dynamically in the UI.
Let's replace contents of INPUT.json with the following:
{
  "keyword": "garlic press"
}
Note
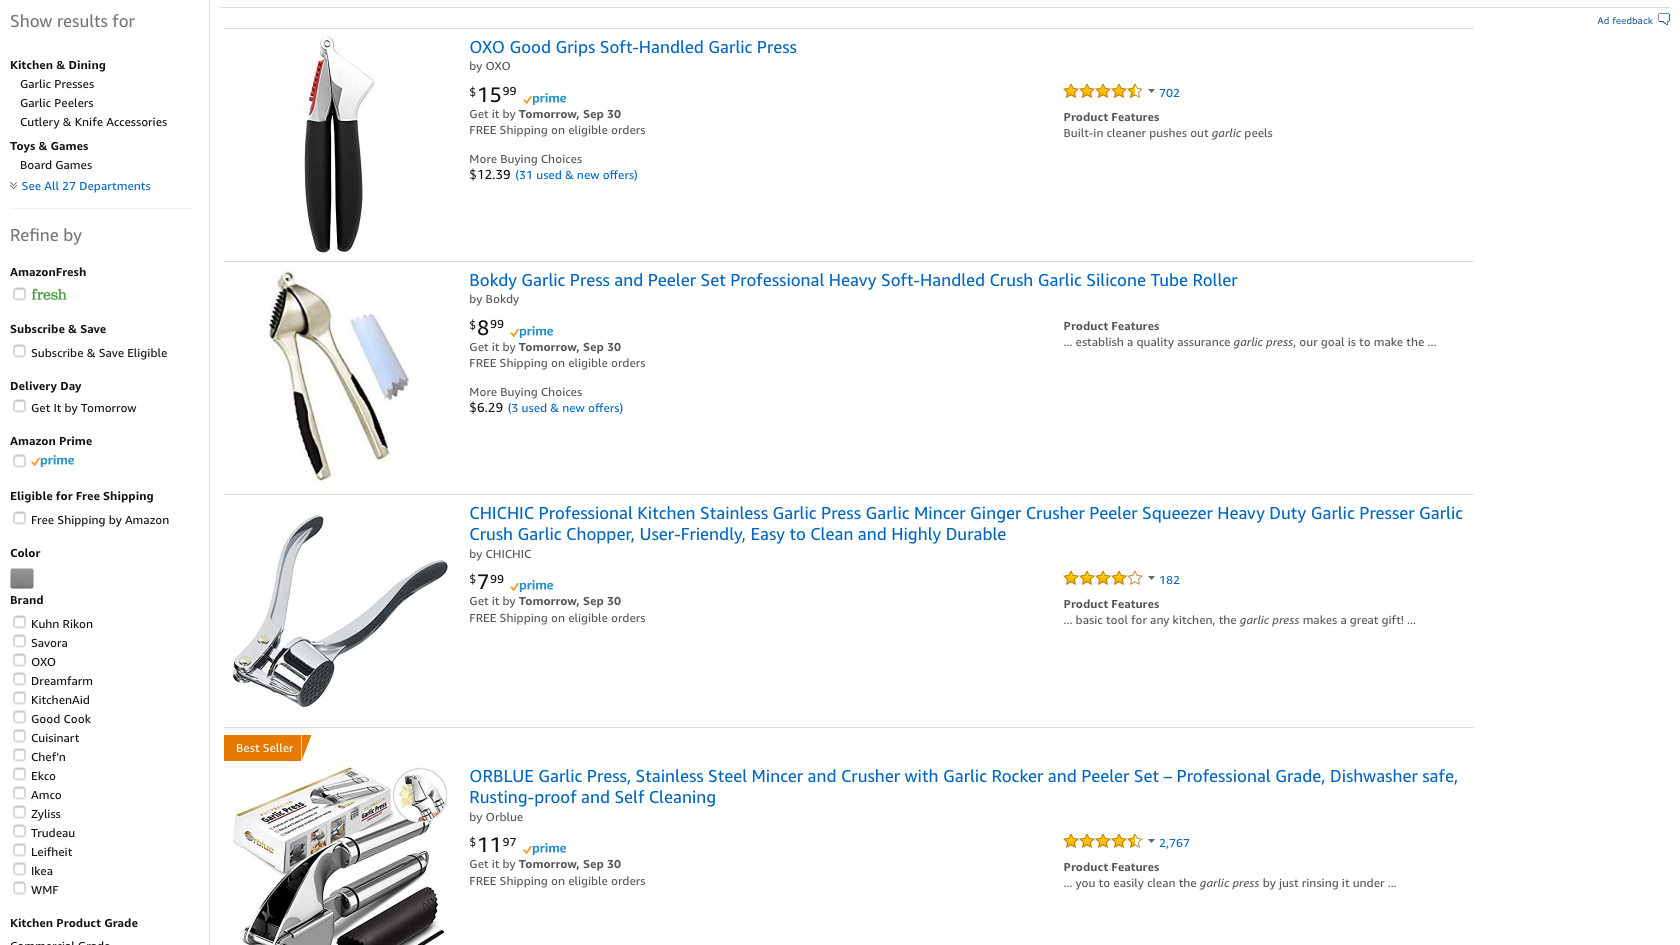
Adding an exclamation mark (!) to the Amazon search term forces the results into a one product per row format, rather than a mix and mash of boxes and rows.
Run the code with apify run command.
You should see a similar output:
Run: npm start

> not-amazon-scraper@1.0.0 start /.../not-amazon-scraper
> node main.js

Launching Puppeteer...
INFO: Launching Puppeteer {"args":["--no-sandbox","--user-agent=Mozilla/5.0 (Macintosh; Intel Mac OS X 10_12_6) AppleWebKit/537.36 (KHTML, like Gecko) Chrome/68.0.3440.106 Safari/537.36"],"headless":false}
Searching for keyword garlic press...
Title of the page is "Amazon.com: garlic press!".
Closing Puppeteer...
Done.
Getting Product Details
This code is a good start, but it only lets us get the search result page.
However, if we need extra product details that are not available on the search result page, then we need to load each product page separately.
For that, we need to use a request queue. A request queue is something that Apify manages for us, to ensure that we are not overloading our machine or the remote server (in this case Amazon).
We can populate this queue with new URLs as fast as we can, however, the processing of the queue is happening with pre-defined frequency (throttling).
As a core feature, Apify takes care of the state maintenance. Even if the scraping process dies, it saves the state. On the next run, Apify resumes where it left off.
If you want to restart the scraping a-fresh, you need to purge the store and state. A useful parameter to know is apify run --purge, which reruns your scraper, but deletes the state and storage before doing that. Useful for development and experimentation.
Let's upgrade our code and add the queue capabilities.
I've commented the code extensively. Hopefully, it all makes sense.
const Apify = require('apify')

const getInnerText = async (page, selector) => page.$eval(selector, el => el.textContent)
const numberify = string => Number(string.replace(/[^\d.]+/, '') || 0)

Apify.main(async () => {
  const input = await Apify.getValue('INPUT')

  // Object from `./apify_storage/key_value_stores/default/INPUT.json`
  if (!input || !input.keyword) throw new Error('INPUT must contain a keyword!')

  const browser = await Apify.launchPuppeteer({
    // makes the browser "headless", meaning that no visible browser window will open
    headless: true
  })

  console.log(`Searching for keyword ${input.keyword}...`)
  const searchResultsPage = await browser.newPage()
  await searchResultsPage.goto(`https://www.amazon.com/s/?field-keywords=${input.keyword}!`)

  // This is the crawler queue that is populated with URLs to fetch
  const requestQueue = await Apify.openRequestQueue()

  // Define the URL pattern we want to follow from the search result page.
  // This is the URL pattern of the product details page:
  // https://www.amazon.com/$titleKeywods/dp/$asin/
  const pseudoUrls = [
    new Apify.PseudoUrl('https://www.amazon.com/[.*]/dp/[.*]')
  ]

  // Extract and enqueue URLs to crawl from the page.
  await Apify.utils.enqueueLinks({
    // page from which to extract URLs
    page: searchResultsPage,

    // selector under which to look for URLs
    selector: '#s-results-list-atf a.s-access-detail-page',

    // pseudo URL object describing what URL format to look for
    pseudoUrls,

    // which queue to add the extracted URLs to
    requestQueue
  })

  const crawler = new Apify.PuppeteerCrawler({
    // We've already created a browser instance manually, this will reuse this instance, otherwise
    // a new instance would open up and we'd have 2 browsers running.
    launchPuppeteerFunction: () => browser,

    // This function will be called on every successful product details page fetch:
    // productDetailsPage is the following Puppeteer object:
    // https://github.com/GoogleChrome/puppeteer/blob/master/docs/api.md#pageselector
    handlePageFunction: async ({ request, page: productDetailsPage }) => {
      const title = await productDetailsPage.title()

      // The following CSS selector handles different variants of page layouts and pricing types.
      // It is by no means exhaustive, but the ones I found were used in this category.
      const buyBox = await getInnerText(
        productDetailsPage,
        '#price_inside_buybox, #newBuyBoxPrice, #soldByThirdParty .a-color-price'
      )

      // Save data in storage.
      await Apify.pushData({
        title,
        url: request.url,
        buyBoxPrice: numberify(buyBox)
      })
    },

    requestQueue,
    maxRequestsPerCrawl: 100,
    maxConcurrency: 5
  })

  await crawler.run()
  await browser.close()
})
Cloud Deployment
Once you run the code with apify run --purge, the results are stored in JSON files in ./apify_storage/datasets/default directory.
But what about scaling and all that cloud buzz?
Let's deploy our scraper to production and let it loose!
-
Sign up for a free Apify developer account.
-
Then run
apify login, and get your token from this page. -
Once you are logged in, run
apify pushto upload your project to the Apify servers.
When you visit the Actors section, you should see not-amazon-scraper project listed (or another name you've chosen).
Click to open your actor.
In the body section, put:
{
  "keyword": "garlic press"
}
This is the input the actor uses for searching.
Previously, during development, we've set the keyword in the ./apify_storage/key_value_stores/default/INPUT.json file, but in production, we have a dynamic input, which we can change on every run.
Click Run button.
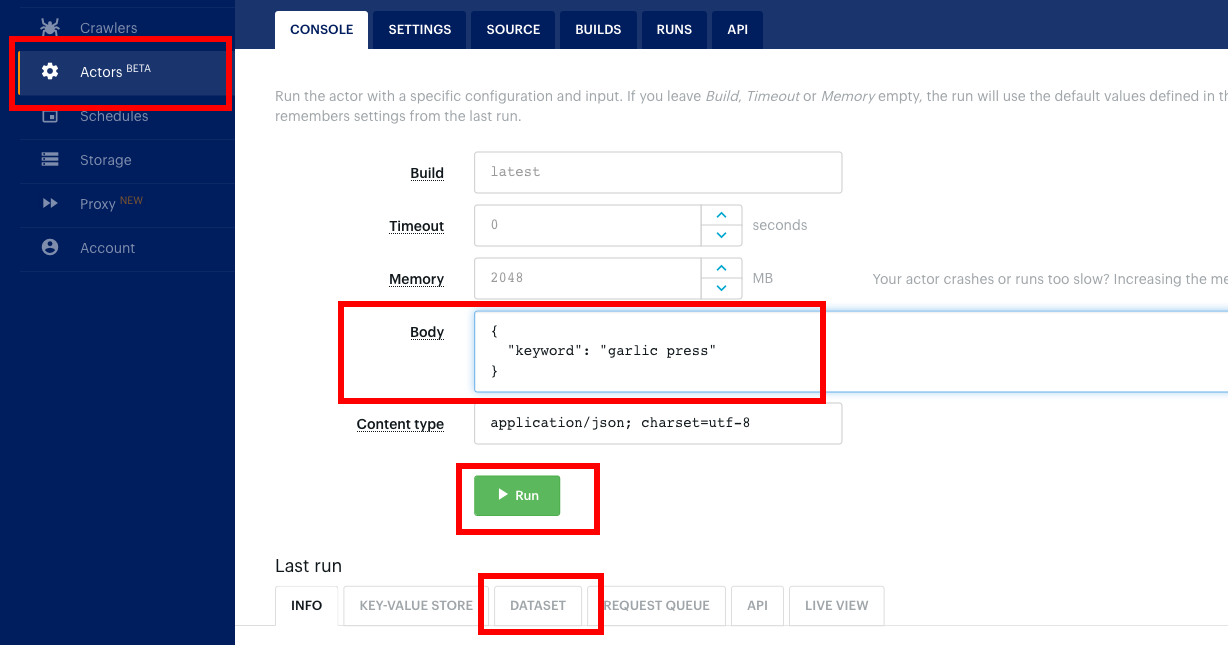
Scroll below on the actor page, and you should see the console output from your scraper.
After the scraper has finished, click on the Dataset tab, and you should have the data that the scraper had saved.
I love that Apify infers the data structure and provides it in various formats automatically. Not only JSON, but you can see an HTML table, download an Excel file or CSV, XML and even RSS.
- You can find this code at our GitHub repository.
- You may also use the actor that I've deployed directly from the Apify library.